Building a Full-Stack Budget Tracker Application with Amazon Q CLI: An Iterative Approach
Introduction
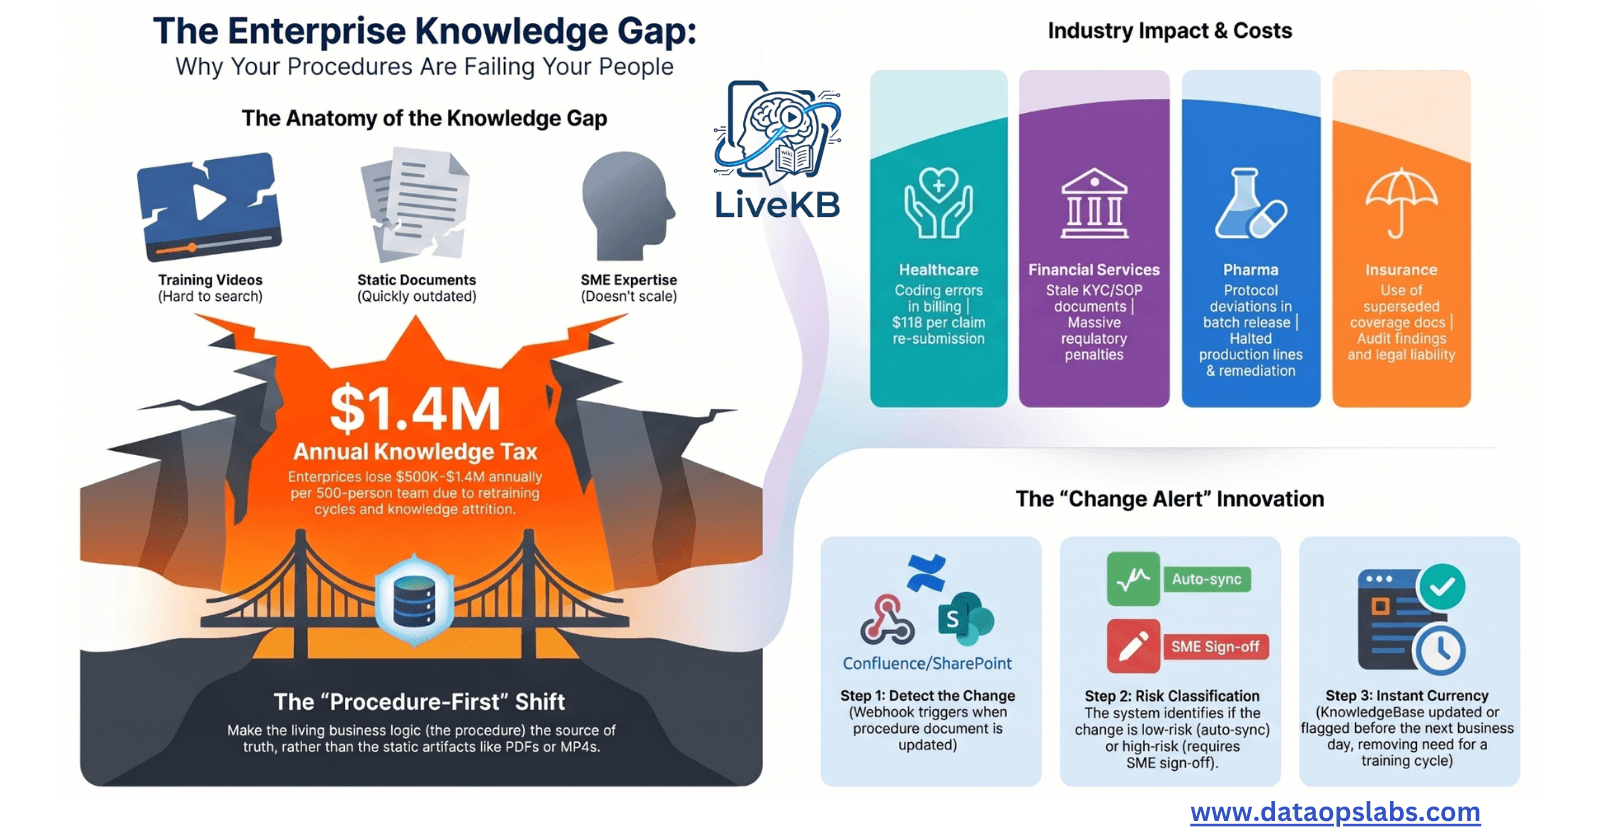
In today's fast-paced development world, AI coding assistants like Amazon Q are revolutionizing how we build applications. However, many developers initially approach these tools with unrealistic expectations, hoping that a single prompt will generate a complete, production-ready application. The reality is much more nuanced and, ultimately, more powerful.
This blog post documents my journey of building a complete Budget Tracker application using Amazon Q, highlighting the iterative approach that leads to success. Rather than asking for everything at once, I'll show how breaking down the development process into logical steps and providing specific, targeted prompts yields superior results.
The Project: Simple Budget Tracker
Our goal was to create a comprehensive expense tracking application with:
A Flask REST API backend
A responsive HTML/CSS/JavaScript frontend
Docker containerization for deployment
Comprehensive testing capabilities
The final application allows users to add, update, and delete expenses, view summaries by category, filter by date ranges, and visualize spending patterns.
General Amazon Q CLI Requirements
AWS Account
Active AWS account with appropriate permissions
AWS CLI configured with valid credentials
Amazon Q Access
Amazon Q Developer subscription or appropriate access level
Permissions to use Amazon Q features
CLI Installation – Ensure you have Python 3.9+
Install the AWS CLI
pip install awscli --upgradeCLI Configuration
Configure AWS credentials if not already done:aws configureVerify Amazon Q CLI installation:
q --version
The Iterative Development Process

Step 1: Requirements Analysis with BDD
My Prompt:
Create a behavior-driven development (BDD) specification for a simple budget tracker application that allows users to track expenses.
This initial prompt focused solely on defining the requirements in a structured format. Rather than asking for a complete application, I started by establishing what the application should do.
Response Snippet:
Feature: Expense Tracking
  As a user
  I want to record my expenses
  So that I can track my spending

  Scenario: Add a new expense
    Given I have the expense details
    When I add a new expense with amount "45.99", category "Groceries", and description "Weekly shopping"
    Then the expense should be saved with the current date
    And the total expenses should increase by "45.99"
This BDD specification provided a clear roadmap for the application's functionality, which guided subsequent development steps.
Details Prompt and Response: - https://github.com/jayyanar/simple-budget-tracker/blob/main/prompts/BDD.md
Step 2: Test-Driven Development Approach
My Prompt:
Create a test-driven development approach for implementing the budget tracker based on the BDD specification.
With requirements in hand, I moved to establishing a testing strategy before writing any implementation code.
Details Prompt and Response: - https://github.com/jayyanar/simple-budget-tracker/blob/main/prompts/TDD.md
Response Sample Snippet:
import unittest
from datetime import datetime
from decimal import Decimal
from budget_tracker import BudgetTracker, Expense

class TestBudgetTracker(unittest.TestCase):
    def setUp(self):
        self.tracker = BudgetTracker()

    def test_add_expense(self):
        expense = self.tracker.add_expense("45.99", "Groceries", datetime.now(), "Weekly shopping")
        self.assertEqual(expense.amount, Decimal("45.99"))
        self.assertEqual(expense.category, "Groceries")
        self.assertEqual(expense.description, "Weekly shopping")

Details Code: - https://github.com/jayyanar/simple-budget-tracker/blob/main/tests/test_budget_tracker.py
Step 3: Core Implementation
My Prompt:
Implement the core BudgetTracker class based on the test cases, with functionality for adding, updating, and deleting expenses, as well as getting summaries and balances.
Only after defining requirements and tests did I ask for the actual implementation.
Details Prompt and Response: - https://github.com/jayyanar/simple-budget-tracker/blob/main/prompts/greencode.md
Response Snippet:
from decimal import Decimal
from datetime import datetime
import uuid
from typing import List, Dict, Optional

class Expense:
    def __init__(self, amount: str, category: str, date: datetime, description: str = ""):
        self.id = str(uuid.uuid4())
        self.amount = Decimal(amount)
        self.category = category
        self.date = date
        self.description = description

class BudgetTracker:
    def __init__(self):
        self.expenses = []

    def add_expense(self, amount: str, category: str, date: datetime, description: str = "") -> Expense:
        expense = Expense(amount, category, date, description)
        self.expenses.append(expense)
        return expense
Full Code Generated: - https://github.com/jayyanar/simple-budget-tracker/blob/main/src/budget_tracker.py
Step 4: Flask API Development
My Prompt:
Create a Flask REST API using the BudgetTracker class with endpoints: POST /expense, GET /balance, and GET /summary. Store the code under src/app.py.
With the core functionality in place, I moved to creating the API layer.
Details Prompt and Response: - https://github.com/jayyanar/simple-budget-tracker/blob/main/prompts/greencode.md
Response Snippet:
from flask import Flask, request, jsonify
from datetime import datetime
from decimal import Decimal
import json

from budget_tracker import BudgetTracker, Expense

app = Flask(__name__)
budget_tracker = BudgetTracker()

@app.route('/expense', methods=['POST'])
def add_expense():
    data = request.json

    if not data:
        return jsonify({"error": "No data provided"}), 400

    # Validate required fields
    required_fields = ["amount", "category", "date"]
    for field in required_fields:
        if field not in data:
            return jsonify({"error": f"Missing required field: {field}"}), 400
Full Code Generated:
https://github.com/jayyanar/simple-budget-tracker/blob/main/src/app.py
Step 5: API Testing with Postman
My Prompt:
Create a Postman Collection to validate all usecase and store the response testing_api/postmancollection.json.
To ensure the API worked correctly, I created a comprehensive testing suite.
Response Snippet:
{
  "info": {
    "name": "Budget Tracker API",
    "description": "Collection for testing the Budget Tracker API endpoints",
    "schema": "https://schema.getpostman.com/json/collection/v2.1.0/collection.json"
  },
  "item": [
    {
      "name": "Add Expense",
      "request": {
        "method": "POST",
        "header": [
          {
            "key": "Content-Type",
            "value": "application/json"
          }
        ],
        "body": {
          "mode": "raw",
          "raw": "{\n    \"amount\": \"45.99\",\n    \"category\": \"Groceries\",\n    \"date\": \"2025-04-02\",\n    \"description\": \"Weekly grocery shopping\"\n}"
        }
      }
    }
  ]
}
Full API Collection - https://github.com/jayyanar/simple-budget-tracker/blob/main/testing_api/postmancollection.json
Step 6: Frontend Development
My Prompt:
Create a Flask REST API using the BudgetTracker class with endpoints: POST /expense, GET /balance, and GET /summary. Store the code under src/app.py. Add a nice HTML interface to display the Expense Tracker application.
Next, I focused on creating a user-friendly interface for the application.
Details Prompt and Response: https://github.com/jayyanar/simple-budget-tracker/blob/main/prompts/flask_ui_html.md
Response Snippet:
<!-- templates/index.html -->
{% extends "layout.html" %}

{% block content %}
<div class="row">
    <div class="col-md-12 mb-4">
        <div class="card">
            <div class="card-header bg-primary text-white d-flex justify-content-between align-items-center">
                <h5 class="mb-0">Add New Expense</h5>
            </div>
            <div class="card-body">
                <form id="expense-form">
                    <div class="row">
                        <div class="col-md-3 mb-3">
                            <label for="amount" class="form-label">Amount</label>
                            <input type="number" class="form-control" id="amount" step="0.01" required>
                        </div>
                        <!-- More form elements -->
                    </div>
                </form>
            </div>
        </div>
    </div>
</div>
Full Code : https://github.com/jayyanar/simple-budget-tracker/tree/main/src
Step 7: Containerization with Docker
My Prompt:
Write a Dockerfile to containerize this Flask application.
To make deployment easier, I containerized the application.
Response Snippet:
# Use Python 3.11 slim image as base
FROM python:3.11-slim

# Set working directory in the container
WORKDIR /app

# Set environment variables
ENV PYTHONDONTWRITEBYTECODE=1 \
    PYTHONUNBUFFERED=1 \
    FLASK_APP=src/app.py \
    FLASK_ENV=production

# Install system dependencies
RUN apt-get update && apt-get install -y --no-install-recommends \
    gcc \
    && apt-get clean \
    && rm -rf /var/lib/apt/lists/*
Debugging and Fixing Issues
Throughout the development process, we encountered several issues that required iterative problem-solving:
Issue 1: Module Import Error in Docker
When trying to run the containerized application, we encountered:
ModuleNotFoundError: No module named 'budget_tracker'
Prompt for Fix:
Update the docker file since it is missing ModuleNotFoundError: No module named 'budget_tracker'
Solution:
# Copy the budget_tracker.py file to the root directory for Docker
# This allows the import to work both locally and in Docker
COPY src/budget_tracker.py .
This fix ensured that the module could be imported both when running locally with python src/app.py and when running in the Docker container.
Front End UI

Lessons Learned
1. Break Down Complex Tasks
Instead of asking Amazon Q to "build a budget tracking application," we broke the task into logical components:
Requirements analysis
Test development
Core functionality
API layer
Frontend
Containerization
2. Provide Context and Feedback
Each prompt built upon previous responses, providing context and feedback:
"This works, now let's add..."
"There's an issue with X, can you fix it by..."
"Let's enhance this by adding..."
3. Iterate Based on Results
When issues arose, we didn't start from scratch but instead provided specific feedback to refine the solution:
"The Docker build is failing because of module imports"
"The API returns a 403 error"
4. Maintain a Clear Vision
Throughout the process, we maintained a clear vision of the end product while being flexible about implementation details.
Conclusion
Building a full-stack application with Amazon Q is not about finding the perfect one-line prompt that magically generates everything. It's about breaking down the development process into logical steps, providing specific guidance at each stage, and iterating based on results.
This approach mirrors traditional software development methodologies but accelerates them dramatically. By working iteratively with Amazon Q, we were able to build a complete Budget Tracker application with a fraction of the effort that would have been required with traditional coding.
The key insight is that Amazon Q is not a replacement for developers but a powerful tool that amplifies their capabilities. By understanding how to effectively collaborate with AI coding assistants through iterative prompting, developers can achieve remarkable results in record time.
Youtube Video for Step by Step Explanation
Stay Tuned for Part 2 - Where we covers deployment this application to AWS Fargate using SAM template.
This blog post is based on a real development process using Amazon Q. The complete source code for the Budget Tracker application is available on GitHub.